Pages

22.5.13

It's All Fun & Games Until....

 
Someone builds outdoor games then it’s “MOM you’re the best!” Or so I would like to think that’s what would my kid would say.
 Our house is usually the “get together” house & lately it has been more of a “under construction” house. As I am creating all my outdoor projects, I am also thinking of all the things that I need to do to keep the kiddo’s entertained & safe. The kid is 18 (sniff sniff), but I have lots of friends with little ones & I always like to include them in my plans as much as I can. Especially because the kid is leaving me in August & well, I am just going to have to borrow some kids, especially my nieces. I love having my nieces over; we play games, create a mess of art projects, watch outdoor movies & bake cakes at midnight!  Yes, my sister-in-law says I spoil them, but so what! That’s what Aunts are supposed to do & a little sugar high won’t bother me any if I hand them back over to their parents. (wink, wink)  Nonetheless, I do plan on doing more family & friend things at the house before the kid flies the nest & soars.  So my quest begins for a search of outdoor games. I saw a few ideas that I really liked, however the space, the pocket book & the construction reigned me in.  I chose the following games because not only would it be fun for the kids, it would be fun for a whole bunch of drunkards too, I mean adults! It was also easy, cheap & wasn’t such an eye sore, hopefully I can spark some great ideas for you.

LET THE  GAMES BEGIN!
WASHER PITyou can make this for pennies on the dollar, you choose the material you want. What you need, a hole, 15'-21' apart & washers (2.5" sold at tractor supply) As far as a box or area surronding the hole, the ball is in your court. Rules vary & the official game requires 3 holes & 1.5" washers. I chose the following since it was easy on the pocket book, not an eye sore & easy to just walk outside & start playing.
ITEMS:  1x2 x 8 wood (cut 4-2'), 4" pvc couplings (or any 4" item such as tin can), Washers (4 per team)
I bought white wood 1x2x8 for $0.99 & protected it with clear coat & spray paint. I purchased the surrounding cover with recycled rubber mulch (1/2 off since its an open bag, LOWES) PVC couplings at the restore & Washers (tractor supply is the only one locally that sells the 2.5" & they sell out, I was able to obtain 5 of them for now)
I measured 21' from center point to center point of the pvc. Dug a hole with a hand held hole digger, boxed it in 2' surrounding & reused weed barrier that I pulled from another area. Filled the area with rubber mulch & covered the hole with slate so no debris can fill in the hole. (the slate is easy to break to the size you need, by using a hammer & then I tap the sharp edges with the hammer so it wont be so sharp)  To keep the washers in an area that I can find them, I screwed in a lug screw to the tree. The washers just hang there. (of course I spray painted them first).
The whole project took about 1.5 hours to do.
Total Cost: less then $10   (note this was less then $6 because I only purchased 5 washers, I will get more & the cost will be about $10)
 Bella- dog tired. I made her dig the hole. (just kidding) She was playing with her toys & then in the pond.

 1x2 painted, weed blocker layed, I tampered the pvc in with a hammer. Lay a piece of scrap wood over the pvc so you won't crack it.  Then hammer away

 My slate cover, great for keeping debris out, however I think that Helen the hen is making me rethink that. I might have to cover the whole thing, she loves the mulch.
Painted the washers bright colors so we can see them.

 A home for the washers. I screwed in the bolt & have the set sitting there. I am going to make a board to keep score, this will be the last thing since I have several games in mind & would like to have one score board. But we shall see. The wheels are turning.
and your done!! One washer game ready to play
||zzzzzzzzzzzzzzzzzzzzzzzzzzzzzzzzzzzzz||
 Twister with a Twist:  I actually researched this for a while & found that I was not willing to spray paint my grass. For one, grass doesn't like the 20 trees in our back yard & I want to be able to play this game whenever we want to. I don't want to try to paint the ground, or try to attempt to play on a tarp or canvas. I dream of grass growing but reality hits with the first rain, my yard is a mud pit.
I went to Lowes to purchase the outdoor rug, however someone just wiped them out of all thier stock, so I had to get one from home depot. Same price, whew! Only $19.
ITEMS :  outdoor rug, spray paint, measuring tape & a circle template (used a plastic tub)
I measured the rug (6x8). I had to figure out where I wanted the circles & how many rows we would need. The actual twister game has 4 rows of 6 cirles. The more circles, the more people can play, however you can only use 4 colors as you only have 4 limbs. Makes it easier when you make a spinner (still working on this) I spaced my circles 12". I started 6" in on ea. side. This gave me the ability to get 6 rows. My plastic tub was 4.5 " in diameter. Once I completed my first row horizontally, I measured out the vertical side & did the first row. After  completing this I was able to just add the remaining rows by matching them up, checking measurements periodically.


20.5.13

Pallet Coffee Table - In the making


Have you seen that table? The one with the gutter in the center of it, so it can hold DRINKS!!! Super cool huh? Did I tell you I am cheap and I don’t like to spend too much money? I searched high & low for a used gutter and unless I wanted to tear one of mine off it wasn’t going to happen. First of all, I didn’t need an 8’ gutter. I wasn’t going to spend more than $10 for something that might not get utilized & frankly, unless I wanted to drill it, I didn’t see a really good drainage system set in place for that DRINK HOLDER. Of course I start looking around for something else. By looking around, I mean by looking at what I had at home. Now let me get off track for a minute and let you in on something. That’s if you don’t know already.

If I don’t have the money in my budget, I do not buy an item. I do buy things on clearance when they are out of season, because guess what? It will be in season soon. Start looking at winter stuff in the summer & vice versa. If you are going to buy something on sale, it will be because you will utilize it. EXAMPLE: I love pots (not the smoking kind) the ones you plant things in; I like to organize using unconventional items, therefore buying pots for cheap will be used in some shape or form. I don’t believe in using your credit cards, we own none. I LOVE saving my pennies for trips & I LOVE creating things. This is not to say that I don’t splurge every now and then but for the most part, cheap is best & if you are on a tight budget, I know you can make something fabulous for PENNIES ON THE DOLLAR!

OK so let’s proceed.  – We needed a coffee table for our new seating area. We had a pallet & I had a $0.75 window box planter in plastic. (thanks target). Since we entertain a lot I wanted something that could hold drinks, I mean I didn't want anyone to get up & have to walk all the way across the yard to get one. They need to relax & have fun. We must have a coffee table with the drink holder thingy.
Items - Pallet, Wood, Planter (it has holes to drain the ice), Saw, Hammer, & footing of some sort (we used 4x4 cull lumber)  Plywood for shelving (optional)
Alternate idea: You could also use just round plastic pots on ea corner.
STEP 1: Choose a nice even pallet, with good structure.
The planter has been sitting outside for a few months now. Nothing that a good wash wouldn't cure.
Measure your location. I found the center of the pallet & found the center of the planter & cut the center with a jigsaw and a circular saw. I added scrap wood to fill the slots, sawed to size,screwed down, sanded then added the first layer of stain.
 
 
added another layer of stain, the different types of wood shows different amazing colors. Im in love. I cleaned & spray painted the planter & plopped it right in!  YAY!
  This project is still in the making. I stopped so I can do the garage and well, it's on  mini  hold.
 Pictures & finish product coming soon! Hopefully by tomorrow. So far the cost for the top is $4.75 (yep, free pallet, oops paint stain in garage & screws that I had all included. The spray paint cost $3 & some change but I barely used any of it & had enough to finish another project.  Technically this is less then $2 to make, if you utilize every item for another project. NOW FOR THE REST OF THE STORY!!!
I used a scrap piece of plywood to build a shelf  NOTE: because pallets come in all shapes, sizes & conditions, I was not able to match the shelf depth on ea. side. Im ok with this as I won't be utilizing both sides that much.  
I used 2- 4x4 on each side to stabilize the table evenly (my mud pit yard would not be able to stabilize a coffee table with legs)
the opposite side I used cedar scrap wood
The sides
I added scrap wood to the sides & hide the 4x4's. I kind of like the 2 tone look but I may change this later.
 Now time to add ice & drinks, or plants or whatever you want. My sad set up. I threw what we had in there. The ice lasted about 6 hours, pretty awesome! Finally melted


& here it is in all its glory.


Hopefully this sparked some ideas for your outdoor hangout place!  
Xo-Xo
~Mel


Row, Row, Row your boat!


Row, row, row your boat… straight to my brother’s house. Our fishing boat has been in the garage for quite some time. Every year we said that we were going send  the boat to the shop, every year a new excuse came & went with the days! Finally my brother stated he would take it, fix it & dock it by his house. All we had to do is get it out of the garage, get tags for the trailer & my brother would do the rest. We didn’t have to haul it out every time we wanted to use it & we didn't have to pay anyone to fix it, & my brother could use it anytime & so could we, with the excuse I get to see my wonderful nieces.  It was a Win, Win!  Well actually, it was hitting the lotto for me. Between the husband, the brother & I, I think I am the most excited person about the boat getting out of the garage. The boys are more excited about it going back into the water. Yes, it would be fun to get on the good old fishing boat, but seriously, it would be a lot more fun having a workshop in my new bare garage!!!  YEP! not so bare. Actually the sides were semi organized but I couldn't wait and I started moving things around & placing things in the attic. So this is the MAD DIY'er Chaos! Im ok with it because the vision in my head is coming alive.
EXCITED ? YES! I am super stoked! I stopped the backyard stuff to tend to a little TLC in the garage. The garage was my last to do project, but not for this MAD Procrastinator DIY’er- The backyard is on mini hold. I promise to get back on track, for my sanity & for my poor feet. I need to learn to wear shoes! I’m a barefoot kind of gal, doesn’t mix with clumsy. I have stepped on nails (YAY, for tetanus shots) I have stepped on glass (YAY, for temporary mosquito relief, they bite less when blood is available to them) I have stubbed my toe (YAY, no worries about chipped nail polish). I need to replace my old work shoes ASAP!  For now here are a few ideas to help inspire an organized garage /workspace area for CHEAP!!
<Have brother take fishing boat! Bye bye boat!>
Have friend give you all the extra scrap wood out of truck (there is more)
& start building.
This is a shelf that I am building for my OOPS Paint! I love me some oops paint!
Build a paint shelf
COST TOTAL $6
for the screws, no tax included & actually its less then that since I only used 2 screws on ea side & wood glue for added support.
Im getting my DIY projects organized. I suspect a few less gray hairs from now on! Im in DIY heaven! I am not going to go into detail with all the organization as of yet,  I really need to finish the back yard, but for the most part I can organize a few things so I can build, build, build, then blog it!
Xo-Xo
~Mel


10.5.13

Rainy day projects

It’s Raining Its Pouring, Melissa is bored & touring…. Neighborhoods that is; looking for diamonds in the rough, in the rain, because I need to fund some project ideas for the great outdoors. Well I found a few pieces & I am so excited to beautify them. My mind is swarming with ideas & lack of sleep is not helping. I am just looking outside, thinking, I need to finish by this Saturday. Of course not all the projects I want are going to be done, but I want to get most of them done so after prom, kids can come over & hang out in a safe NON-construction zone yard. I want to have some fun games, seating areas to lounge & relax.
But for now I will have to do other things, like clean up goose feathers (down pillow got torn into, thank you Bella the lab), wash dishes & clean the kid’s bathroom (bleh).
So you ask, how can I multi task between chores & projects? It’s easy. Before I start, I make a mental note of what needs to be done, what needs to wait (noise, fumes etc.), & what I can do right now & check off my list. I usually start with separating clothes to do laundry, I prepare the sink with hot water to soak my dishes & I move all furniture that is in my way of dusting or sweeping. After I complete this task, I prepare my work area; see what I need for my indoor project, such as drop cloths, paint, screwdrivers, etc. Once everything is prepped, I load some laundry, I start soaking the dishes & then I work on my project. If I need to sand it, I go to the front since I have a covered porch, if not I start priming & painting the first coat, while this is drying I start dusting, sweeping & load up the dishwasher (after I scrub them down) YES, I am that person. After I am done, I will start doing a second coat of paint, then by this time load the dryer & add a new load of clothes to wash. I start cleaning my brushes so I can use a new color if need be & start looking to see what I can put in my box to take back to the garage. I keep a box of tools I am using so I can go straight to them. I don’t like to keep putting items I am using daily up, not lazy but it makes it easier for me to just start working with exactly what I need. And since I am queen procrastinator, I time myself. I give myself anywhere from 30min to an Hour to finish something. I’m learning to take baby steps. Like I said my mind is going a million miles a minute & I need to write ideas down so I can move on with current projects. So back to the rainy day projects… oh PS, it is highly recommended not to paint while it’s raining. The humidity makes it dry slower, though I never listen.
 

I found a night stand, took away the top drawer (making it into a doggy bed) & built a shelf in its place.

 
  found a beautiful little chair & this fabric that I loved but I needed to find a home for it & I think I did on this chair. I still need to complete the details, but for now this is it.
 
& these belong to my friend. She has had them sitting on her balcony for a while & I offered to take them & remake a planter for her. Pics. Coming soon.


 Looks like the sun is shining. Off to take  the completed planter to my friend, pick up some great clearance deals at Joann fabric & run some errands. Be back with some outdoor games soon!
Remember, Mom's day is in 2 days!!! 
Happy MOM's week Xo Xo 
 
How to's will be coming soon on the above projects!
 
~Mel
 

6.5.13

The Cacti & The Stump - a true love story!


There was something about drift wood, stumps & fallen trees that made my mom happy. She would always mention how pretty they looked lying there, placed in the right spot to guide you towards a path, house an animal or protect a nearby plant. Seeing this through her eyes always made me happy when I would find one on my own. My house is nestled next to a wooded area; perfect enough that it drowns out the noise from the traffic & houses some interesting creatures, including a fox & a brave little raccoon who likes to sit on our driveway gnawing away at something s/he found in our trashcan. As I am transforming our backyard on a NATURE budget, (free & nature designed) I was able to find some great fallen elm & cedar trees. The stumps were screaming, please show me off! So here we are, a love through my mother’s eyes & a passion for transforming things out of nothing.   

I started digging up rocks in the woods so I could utilize them in our garden, at the same time I started pulling & dragging limbs, stumps & trees. YES, I dragged a fallen elm tree that was 12 + feet (I know this because I was able to cut 3 -4’ pieces & there was a couple of feet left of it). I didn’t want to delve into this project but I did want to utilize my time & kill multiple birds with one stone. I will show you my rock projects soon, but for now, the love story of The Cacti & the Stump.

NO TREES WERE HARMED IN THE MAKING OF THIS PROJECT –
2 pieces I found debated on which one I wanted to start with
 I chose the one on the right  


 I do not own a chainsaw so my ryobi circ. saw had to do. I positioned the stump to sti the way I wanted it to, check to see if it is balanced & it wasn't.
 B- I then cut the bottom to make it balanced
A- I started to cut around the stump
Cutting around the stump
 It's getting late, Mr. Soggy bottoms is croaking
 Take the project indoors & cut the middle section with a saw (great arm workout)
$4 bow saw from habitat for humanity (Austin, TX)
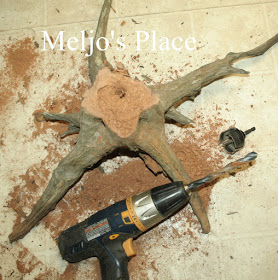
 I used my hole cutter for the drill to mark the area  I wanted to cut. (Note: it doesnt cut through the stump, just makes a circle)
Then I took a large drill bit & started drilling within the perimeters
I drilled & drilled away (what a mess)
I bagged the cedar shavings- They smell great & I know I can use them somehow
 My dollar store items, moss & glue
 A collage of the stump
 I super glued the moss (I didn't want to use hot glue as I wanted it to be water proof) The side of the stump has a tiny hole where the drill shaved through, I purposely did this so the water can seap out & or the roots can go through. Add  the plants & soil, a bamboo skewer helped me tuck in the roots & moss.
It was love at first sight, meant for ea. other.
THE END!!

TOTAL COST
$3.23
BREAKDOWN- 4PK CACTI $4.95 (only used 3) $1 Glue, $1 Moss
 
TIP: Make sure your stump is stable & balanced. You can add footing to bottom or just simply cut something straight. In the process of drilling the holes, I did manage to make a small hole by one of the crevices so the water can drain. This is my first time making one so I am not certain if this will be able to help or at least let the roots grow.  Cacti, are easy to grow & able to tolerate once or twice a week watering. Please feel free to send me pics of your projects. I would love to check them out.
Reproduction Strictly Permitted, Not responsible for; splinters, new addiction of dragging dead wood home or a finding a new love of stumps & cacti. I recommend that you use goggles, & have some common sense of a circular saw if you so decide that this is the tool you want to use.
Happy Mother’s Day Week
Xo-Xo
~Mel


INSOMNIA FOR THE MAD DIY'ER!

I couldn’t sleep, it was cold outside & I was unable to really take care of my backyard projects. I waited to go treasure hunting since I started watching a 1975 Robert Redford movie & I was really intrigued by the movie & researching what to do with all my cedar shavings. (more on that later). Finally it was time, 2am I decided to drive around a nearby neighborhood that is scheduled for bulk pick up.  If you don’t know what bulk pick up is, this is a time where you can purge your house of anything that you don’t want; Toilets, Furniture, Appliances & other misc. items, place it on the curb & not get charged for it. The city schedules this usually 2 times a year. I don’t like to dig during the day, since I feel like I am standing their naked & everyone is staring. Also, deep down inside, I feel if I missed something great, it wasn’t meant to be & it will help me reign in my DIY projects.  Like I stated before, I am known to start multiple projects at the same time, or I will start thinking of what I need for another project & keep that in mind just in case I find a freebie.  So I take off, at 2am on the prowl for one major thing in mind, a desk chair for the guest bedroom.  Other items that I have in mind are storage items for the garage (last project on my road of DIY at home), items I can flip (a DIY’er needs to support her habit), dresser & dresser drawers (master bedroom & a doggy project) & OLD sturdy, weathered wood.  JACKPOT!!! I FOUND A CHAIR- I sat on it, I wiggled it, I made sure it had good bones! It looks ugly, but I see pretty chair! I also found table legs. Funny thing, the neighbor came home from the bar & sat there watching me while I unscrewed the table legs. He was probably thinking why the heck ? Why wont you just take the whole table, it was decent. But I didn’t want to. I wanted to make another barn yard table. So there it is, new items, placed on hold & the weather is beautiful today. I get to help out a friend put up a shelf; in return she is giving me some metal chairs. YEEP!!! I am so excited.  
My New Find! Fits perfect in the guest bedroom!
 
AUSTIN PEEPS- BULK PICK UP IS AROUND THE CORNER & PEOPLE ARE GETTING RID OF THINGS. FIND THE NEIGHBORHOODS THAT ARE SCHEDULED SOON & TAKE A DRIVE, WHO KNOWS, WE MAY BUMP INTO EA. OTHER! :)
TIP:  Bring a flashlight, gloves, screwdriver (Phillips & flat head), and maybe a set of pliers. Watch your surroundings & park safely. Best time to go out is at night after everyone has just purged out new items; look online for your bulk pick up schedule & drive around to find your next amazing item!
~Mel
My views are sometimes crazy & strange, however it produces something out of nothing! You can do this too, if you open your eyes, think outside of your box, your circle or what ever shape your in. I am not responsible if you collect items & you turn your lawn or house into a new version of junkyard Samford & Son or if you get bitten by an insect, an animal or a zombie!  Please keep me in mind if you do find something AHH-mazing, & send me a pic & share your project story ! It will make my DIY heart happy!

2.5.13

Pallet Planter


Then a pallet planter was built!

I have honestly tried to find decent looking pallets, you know like the ones on pinterest & other DIY pallet sites, & have failed. I have realized they do not exist, unless I am missing something. I have also realized that using pallets are not always safe. Pallets are used for shipping all sorts of items; such as chemicals, pesticides, & other misc. items, not only does it carry harmful items the pallet itself can be chemically treated. Of course not all pallets are harmful, it can carry food items or misc. house-wares, but it is always better to know what you are working with before you decide to create something out of a pallet. The pallets I used were from a local garden center & they cost $2 ea. I hand selected most of them, but at one point you get so tired at being so picky you just start selecting the ones that are stable. Below is what I did & how I did it with what I had,there is no set plans as ea. pallet is different. Hopefully this can spark some recycled pallet ideas.  
 

Not all pallets are alike or the same size, & in order to make this planter I took the pallet & cut it half with my circular saw. (NOTE: Measure  half from the from the sides that have the footing. Makes it easier to screw in your sides & connect )
A~ cut in half   B~footing
 You may have to cut the bottom portion off & this is not an easy task. You should use a crow bar, but it didn't work for me.

 I used a hammer & pulled up the boards along with the nails. At times the nails were so rusted the head broke just leaving the skinny part, I just hammered it down.
Just make sure you are extra careful & wear gloves when hammering or pulling, NEVER wear gloves while sawing. I took the bottom slats off as they will be inside the planter & you don't need those. Your pallet may or may not be even so you may have to tweak it alittle. to make it work.
Once the pallet is cut in half, take your scrap lumber that you pulled off, or scrap lumber that you have & set it aside. Figure out how wide you want the planter box to be. Once you figure out your width, measure out your scrap wood to width size & cut. This should be nailed or screwed to the side footing.
screw in sides close  together so you can have the soil contained.
Above picture is one pallet I used. The space between the slats works perfectly for plants or roots to grow out of.
 The above picture is another pallet & the slats were too wide. So I added scrap lumber (1x2 cull lumber) Screwed it in & left a gap so plants & roots can grow out of.
 A ~ gap B~uneven height C~ gap
This pallet is not even & I had to come to terms with that. I attempted to straighten it out but it is what it is. I added the plants & layed a scrap 1x6 cedar picket on top. Went back & sanded it & then stained it.
 
The top cedar is not screwed down. I am still playing with this. Since the front plants are inserted on the side, I still need a way to add soil or fertilizer. I might add footing to the cedar plank & just lay the top down & lift it when needed. I didn't add weed block, but I did reuse a plastic pot, cut it in half & layed it on the top so the plant didnt sink in like the first planter box. The aloe vera plant sank a bit. 
TOTAL
$2.50
 
Doesn't include hardware or taxes, plants are propergated cacti.
More Pallet Projects coming soon!
for now I leave you with a partial pic of my current project. Sorry for the fuzzy pic, I was doing this at 3am. Yes, Im the NIGHT OWL  DIY'er
()v()


TIP:  When you are picking up a pallet it is highly recommended to use gloves. Lots of tiny creatures call this home. You can spray it down with water & let it dry before working on it. If you are trying to make matching planters, make sure that you get 2 pallets that are the same size or close to. The boards do not or may not be the same width, however the size when cutting it in half, makes a world of difference.

~ Mel
Use only as directed...not responsible for extra plant purchases due to multiple planters built.